
Mount Fuji from Tokyo? Copy This Arrival Guide
Most people see Mount Fuji on a rushed day tour.
They get off the bus, snap one photo at the lake, maybe hit a souvenir shop, and then rush straight back to Tokyo.
Not me.
This was my Mount Fuji arrival day—the real way to get here, slow down, and actually start your Fuji trip right. In this guide, I’ll walk you through my full route:
Shinkansen into Tokyo
Navigating the chaos of Tokyo Station
Finding a not-so-obvious bus terminal
That iconic Lawson × Mount Fuji convenience store photo
Renting a car locally (and driving on the opposite side of the road for the first time)
Checking into a hotel with one of the best Fuji views I’ve ever seen
If you’re planning your own trip from Tokyo to Mount Fuji, this is exactly how I’d do it again.
Why I Didn’t Do a Mount Fuji Day Trip
If you Google “Mount Fuji from Tokyo,” almost everything pushes day trips:
Bus in the morning
One or two viewpoints
Maybe a lake stop
Back in Tokyo by dinner
For a mountain as legendary as Fuji, that felt… wrong.
I love mountains, slow travel, and actually being in a place. I’ve spent longer in way less iconic destinations, so for Fuji I decided:
4 nights, 5 days in the Fuji area
Base myself near Lake Kawaguchi
Rent a car so I could do early morning views, lakes, and hikes without depending on buses
So this blog covers Day 0: the arrival. How to actually get there without losing your mind (or your luggage).
Step 1: Finishing the Shinkansen Ride into Tokyo
This day actually started way earlier in Hiroshima.
I’d already taken the Shinkansen bullet train across the country, and by the time I stepped off at Tokyo Station, I was in that weird space between exhausted and wired.
I gave myself about 1 hour 15 minutes between my train arrival and my bus departure.
Technically, Google said the bus terminal was only a 5–10 minute walk…
But this is Tokyo Station. You don’t “just” walk anywhere.
I’m really glad I chose the bigger buffer. A 20-minute connection would’ve been stress city.
Step 2: Surviving Tokyo Station & Finding the Bus
Tokyo Station is a maze.
Underground corridors, exits with names that sound similar, multiple levels, and signs that mostly make sense until you’re slightly tired and carrying gear.
Here’s how it went down:
I followed the Shinkansen exit signs and scanned my QR code to leave the Shinkansen area.
I knew from Google that my bus left from near the Tekko Building by Tokyo Station… but my GPS struggled underground.
I popped out of the station at the wrong exit and ended up circling the outside of Tokyo Station just trying to get oriented.
Eventually I realized I had to go back inside and cut through the station again to reach the correct side.
If you’ve never been to Tokyo Station before, plan on:
Getting a little lost
Walking more than you expect
Scanning your transit card (Suica/PASMO/IC in phone is clutch) to move between certain areas
Finding the Actual Bus Stop
My bus was booked online in advance, and the email said something like Bus Stop #1 near Tokyo Station, tied to a specific operator.
When I finally got to the general area, it felt… off:
It wasn’t a big, obvious bus terminal.
It felt more like the backside of an office building with a few bus bays.
There weren’t huge crowds of tourists—just a quiet little corner with a staff member and a printed list.
I walked up, showed the staff my name, and he found me on his list.
“2A.”
Assigned seat. Done. No fancy ticket needed—just the booking confirmation and passport name match.
It felt very low-key, especially considering how popular Fuji is. But once you know where it is, it works.
Step 3: Lunch in the Weirdest “Dead Zone” in Tokyo
I had some time before boarding and thought, “Great, I’ll grab lunch near the bus terminal.”
Spoiler: everything around me was closed.
The area felt like a corporate ghost town in the middle of the world’s busiest city:
Office towers
Closed lunch spots
One coffee shop open—with no real food
So I did what every traveler in Japan eventually does:
Convenience Store Lunch
I ducked into a nearby Lawson and stocked up:
Teriyaki chicken & egg sandwich
Sausage-in-a-croissant-style roll
Salmon rice ball (onigiri)
A little blueberry snack bar
It wasn’t glamorous, but honestly?
Fast
Pretty decent
Cheap
Way better than “just granola bars”
If you ever find yourself in a random part of Tokyo with nothing open: convenience stores are your best friend.
Step 4: The Bus Ride from Tokyo to Mount Fuji
At 11:13 a.m., I went back to the bus stop and checked in. At 11:21 a.m., we pulled out—right on time.
Here’s what the ride was like:
The bus was completely full—every seat taken.
Seats were a bit cramped, but comfortable enough for a ~2-hour ride.
Air conditioning came on once we started moving (which was a relief—stuffy at first).
The total ride time was about 2 hours 2 minutes, getting us into the Fuji area around 1:30 p.m.
Why I Chose the Bus Instead of a Train or Rental Car from Tokyo
You can reach Mount Fuji by train, but:
It usually requires transfers, takes longer, and isn’t necessarily more convenient with luggage.
You can also rent a car in Tokyo and drive to Fuji, but I decided against it because:
I didn’t want my first time driving on the opposite side of the road to be on Japan’s busy highways.
Tolls leaving Tokyo are expensive, and they really add up.
Tokyo traffic plus toll booths plus navigation sounded like stress, not vacation.
So my plan:
Shinkansen into Tokyo
Bus from Tokyo to Kawaguchiko (Fuji area)
Rent a car locally once I arrived
Zero regrets. This combo was the sweet spot between comfort, cost, and sanity.
Step 5: Arrival at Kawaguchiko – And That Famous Lawson Photo
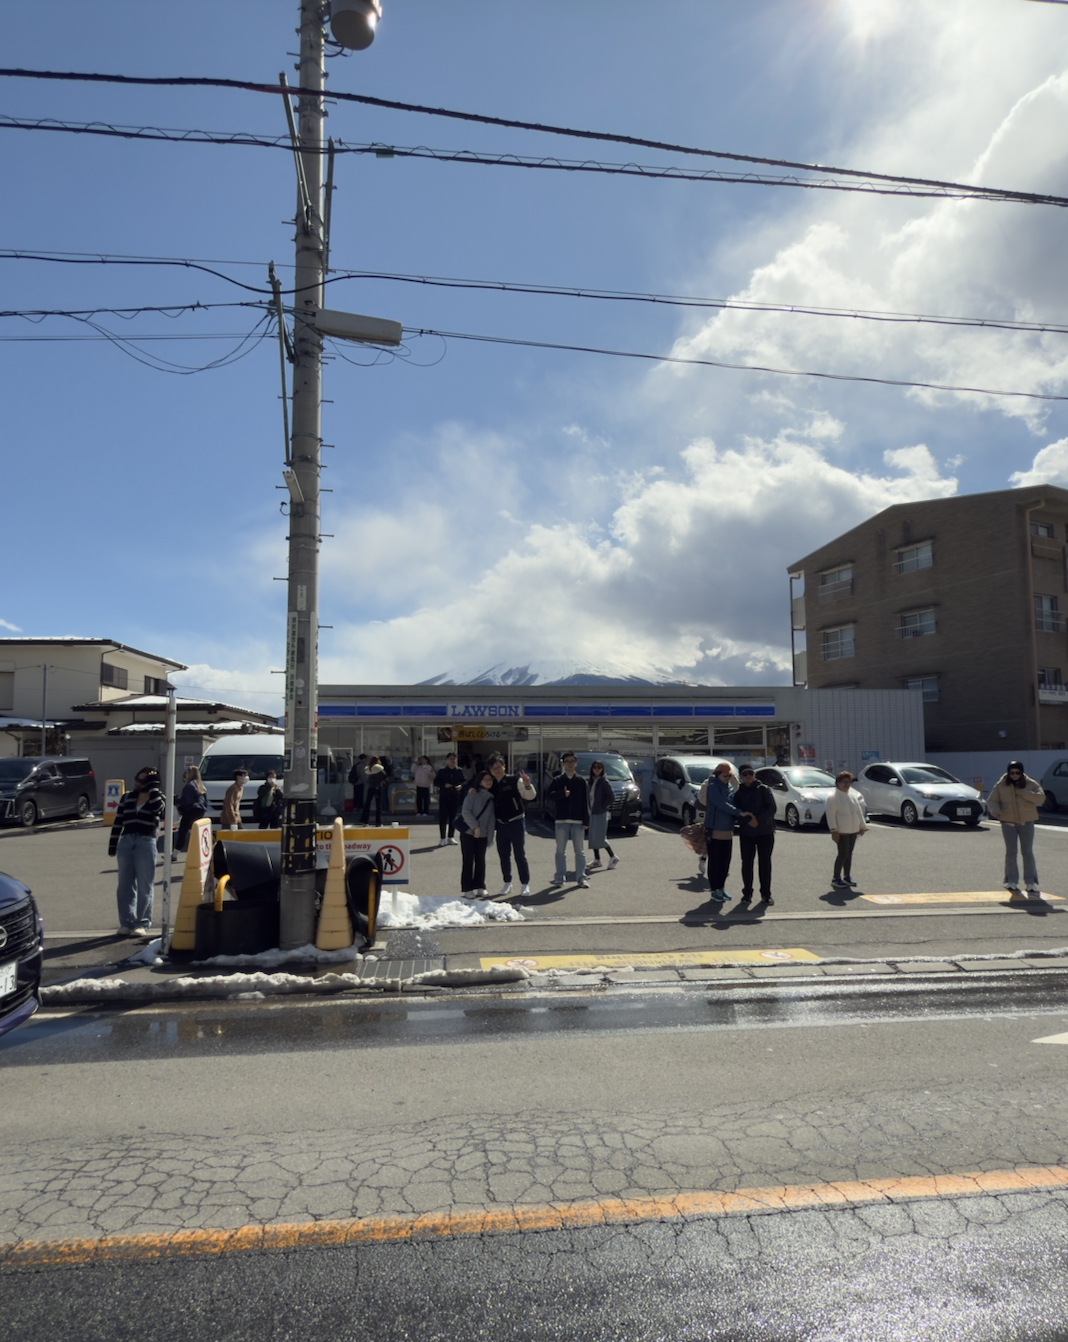
We rolled into the Kawaguchiko area around 1:30 p.m. on a weekday.
The moment I stepped off the bus:
Windy, but sunny
Mount Fuji was there—but with clouds covering the top
The area around the station was packed with travelers
And then, just across the way, I saw it:
The Most Famous Convenience Store in the World
That legendary Lawson + Mount Fuji combo shot.
Lawson on the corner
Fuji towering perfectly behind it (on clear days)
A crowd of people gathered on the sidewalk taking turns with their photos
Even a staff member loosely directing pedestrian flow so people wouldn’t stand in the road
At one point, there used to be a cloth barrier to discourage obstructive photo stops, but when I was there:
No cloth barrier
Fuji partially covered in clouds
But still—one of those “yep, I’m really here” moments
I did the loop, grabbed my photos, soaked it in… and then moved on. Because this was just the start of the trip.
Step 6: Why Renting a Car In Mount Fuji Is the Move
If you’re staying multiple days around Mount Fuji—especially near Lake Kawaguchi—I highly, highly recommend renting a car.
Here’s why:
Early morning views and hikes are tough with limited rural buses
Taxis aren’t always abundant or affordable
Many of the best viewpoints, trails, and lakes are spread out
But renting the car in Tokyo never appealed to me:
Highways, heavy traffic, and complex junctions are not ideal for your first time driving on the left
Tolls are pricey leaving the city
It’s just… a lot
Instead, I booked a rental car through Klook for pickup near Kawaguchiko Station.
There are several rental agencies within walking distance of the station
Mine was about an 8-minute walk away
I picked the one with good Google reviews and solid availability
The First Time Driving on the Opposite Side of the Road
This was honestly the part I’d been stressing about:
Driver’s seat on the other side
Opposite lane flow
Narrower local roads
Snow and ice in the forecast
When I finally got the keys and slid into the driver’s seat:
Everything felt backwards
My brain kept wanting to drift the wrong direction
Turn signal and wiper stalks were reversed from what I’m used to
My internal rule became:
“Never be the one next to the curb.”
If the curb was on my side, I was on the wrong side.
The first stretch was mostly straight roads. Then came:
My first left turn (which is the easier one when driving on the left)
Then some tight backroads
I just took it slow, trusted the GPS, and let myself adjust
Within 15–20 minutes, it felt… not normal, but manageable.
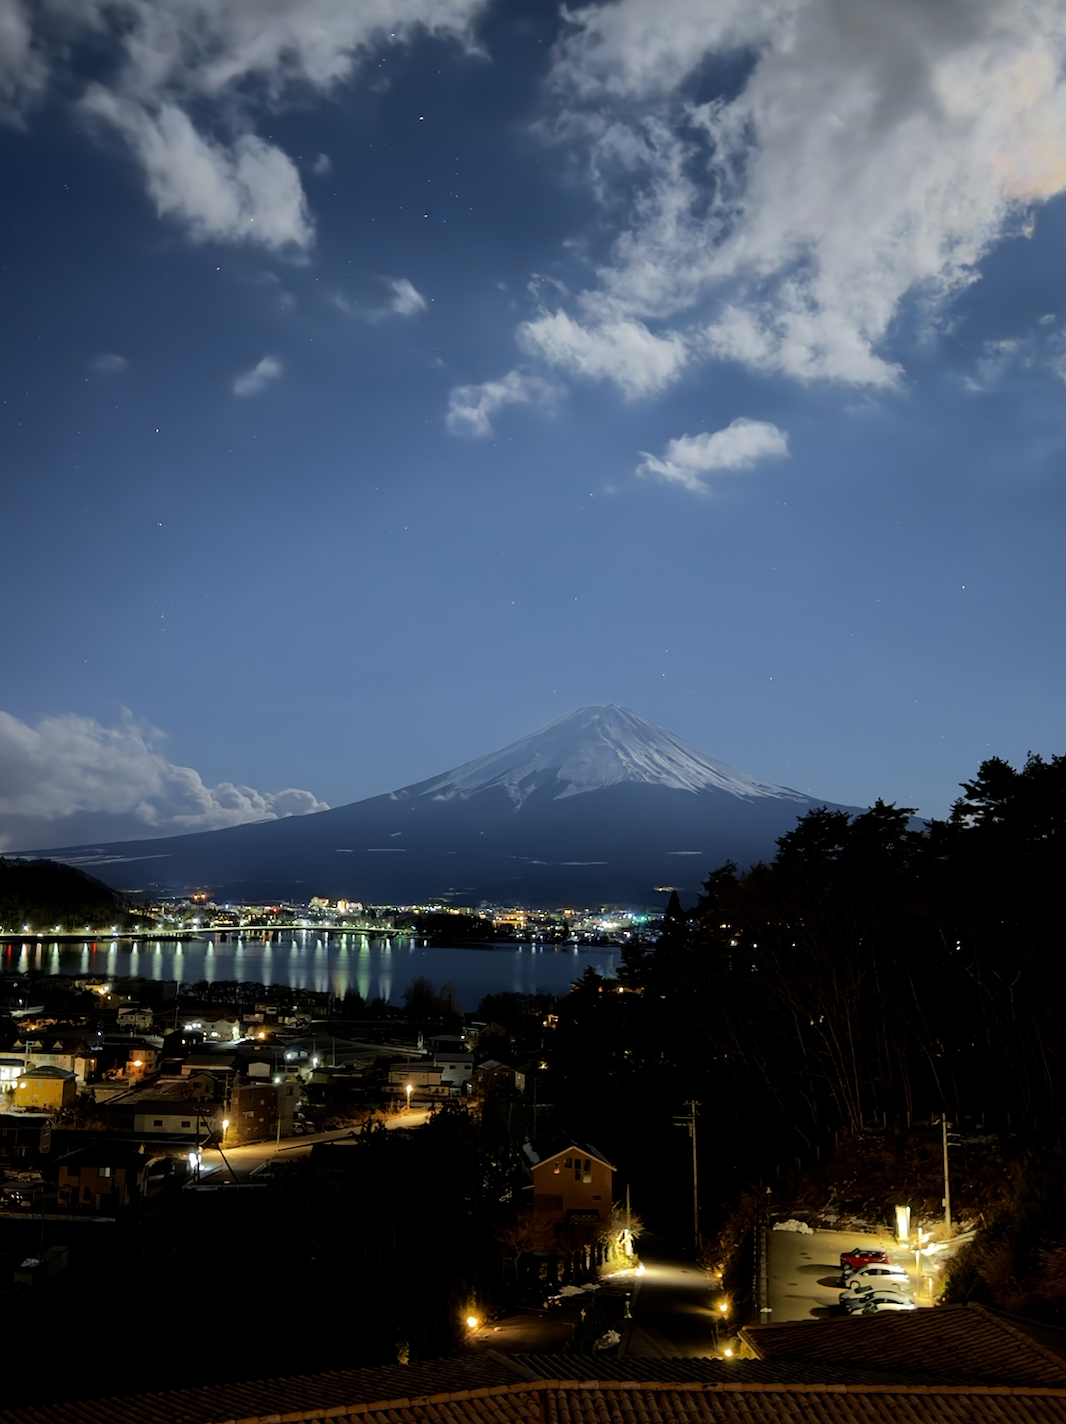
Step 7: Checking into One of the Best Fuji-View Hotels I’ve Ever Had
Eventually, I pulled up to my hotel—and it honestly felt like pulling into a movie set.
Multi-story building on a hill
Balconies facing straight toward Mount Fuji
Big, dramatic lobby
Staff talking about how lucky I was: it had been cloudy all day, and then right at sunset, the sky cleared and Fuji came into full view
The Room
My room blew me away:
Huge bed (basically two twins pushed together)
Multiple sinks (one by the toilet, one in a full-size vanity area)
Large shower
Closet with robes
A wide desk and seating area
And the star: a massive balcony with a direct, unobstructed view of Mount Fuji
By the time I arrived, it was dark, but you could still see Fuji as a blue silhouette against the sky. It might be the best hotel view I’ve ever had.
One Surprise: No Luggage Help
For a hotel at that price point (around $200/night), I expected someone to help with bags.
But nope—I dragged everything myself.
I didn’t mind, it was just funny. I’ve stayed in $20/night places in Vietnam where they insisted on carrying my bag upstairs. Japan has its own logic.
Step 8: Dinner Reality – Convenience Store Again
Here’s what I learned very quickly:
My hotel was 15 minutes by car from most of the restaurant options
The hotel’s own restaurant was very fancy, reservation-only, and required pre-booking
I’d been up since 4:00 a.m. and it was now close to 7:00 p.m.
Decision time:
Drive 30 minutes round trip plus eat at a busy restaurant
Or drive 3 minutes to a convenience store, stock up, and crash early
You can guess which one I chose.
7-Eleven Dinner
I drove to a nearby convenience store and grabbed:
Chestnut-steamed bun
Japanese fried chicken
A few extras to double as breakfast, since I planned to leave early before hotel breakfast hours
Total damage: about $13.
Honestly, with the view waiting back at my room, I didn’t even feel like I was sacrificing anything. Convenience store food in Japan hits way above its weight class.
Lessons from Arrival Day
By 8:00 p.m., I’d been going nonstop for 16 hours.
Bullet train
Tokyo Station navigation
Bus to Fuji
Iconic Lawson photo
First-ever left-side driving
Hotel check-in
Dinner run
And it all set me up for an incredible few days around the mountain: lakes, viewpoints, cherry blossoms, and more.
Key Takeaways If You Want to Copy This Route
Give yourself at least an hour between Shinkansen arrival and your Mount Fuji bus out of Tokyo.
Don’t be surprised if your bus terminal feels like an office building side lot, not a major station.
Convenience stores will save you — for lunch in Tokyo and dinner in Fuji.
Book your Fuji-area rental car locally, not in Tokyo.
Don’t stress too much about driving on the opposite side—start slow on rural roads instead of downtown Tokyo highways.
Paying a bit more for a Fuji-view hotel is absolutely worth it. Waking up and seeing that mountain from your balcony is unreal.
Watch the Full Mount Fuji Arrival on YouTube
If you want to see this exact journey—Tokyo Station confusion, Lawson madness, rental car nerves, and that first jaw-dropping hotel view—check out the full vlog:
🎥 Mount Fuji from Tokyo? Copy This | Japan Vlog
You’ll get to see:
What the bus terminal actually looks like
The Lawson × Fuji photo spot
My first minutes driving on the opposite side of the road
A full room tour of the Fuji-view hotel
Website I used for booking my Japan bus tickets.
Mount Fuji Arrival – Google Maps Pins
Here are the key locations from this arrival day so you can plug them into your own trip:
Tokyo Station (General Area)
Kawaguchiko Station (Fuji Bus Arrival)
Lawson Kawaguchiko Station / Famous Mount Fuji Convenience Store View
La Vista Fuji Kawaguchiko - Hotel I stayed at
Use these as your starting points, then customize around your budget and schedule.